
Are you tired of overcomplicated mounting kits and hours of confusing setup? If you’ve recently purchased the Starlink Gen 3, you probably want to install it fast, safely, and without needing a toolbox full of gear.
Great news: with the 360° Adjustable Wall & Roof Mount Kit for Starlink Gen 3, now available at Parts4Star, you can mount your Starlink Gen 3 in just 5 minutes—and it’s so easy, most people don’t even need extra tools.
Let’s walk you through why this mount is the best choice and how you can get set up in minutes.

Why Choose This Starlink Gen 3 Mount?
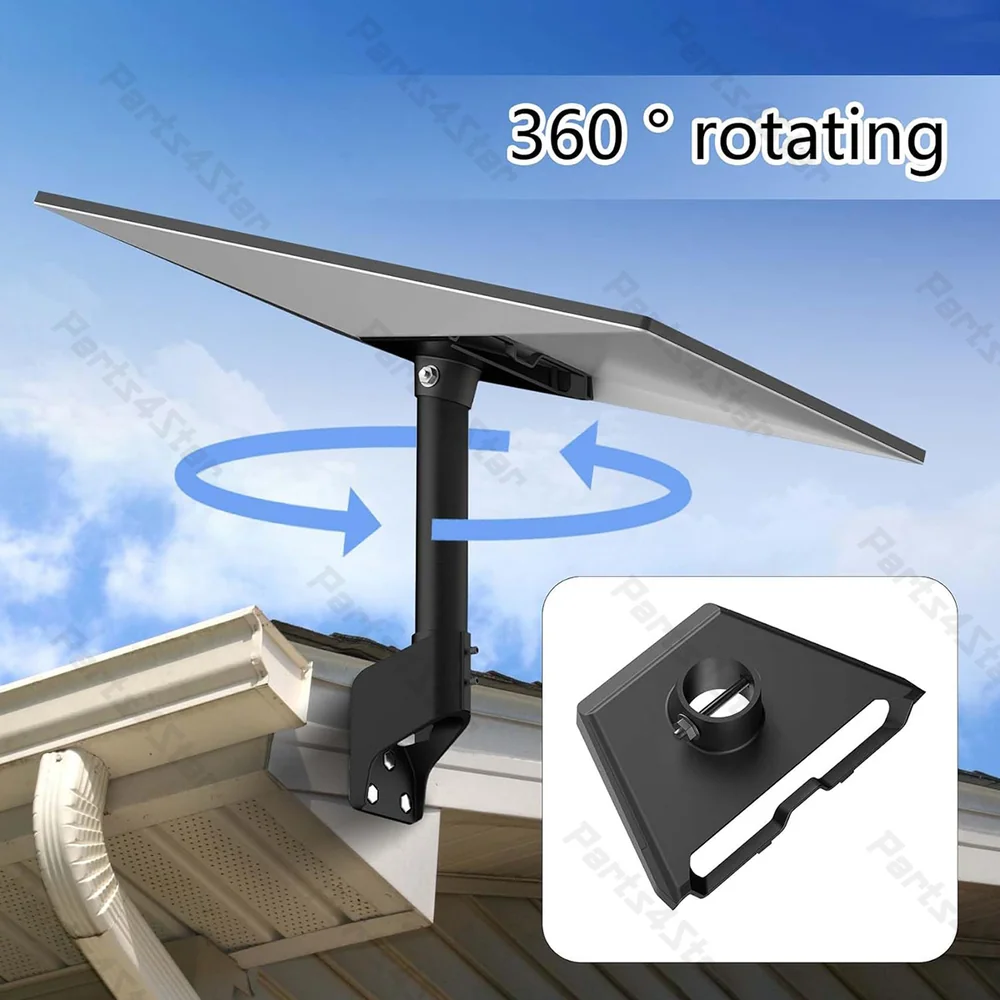
The Starlink Gen 3 mount from Parts4Star isn’t your average bracket. It’s designed specifically for the new Starlink Gen 3 dish, featuring 360-degree adjustability, a strong steel base, and a design that supports both wall and roof mounting.
Here’s what makes it stand out:
- 360° Adjustment: Find the perfect angle for a strong satellite signal, no matter your roof pitch or wall direction.
- All-in-One Kit: Comes with mounting screws, anchors, a wrench, and a drill bit—no extra shopping needed.
- Heavy-Duty Materials: Built with solid metal for wind resistance and long-term durability.
- Versatile Install: Works on rooftops, walls, garages, and even RV setups.
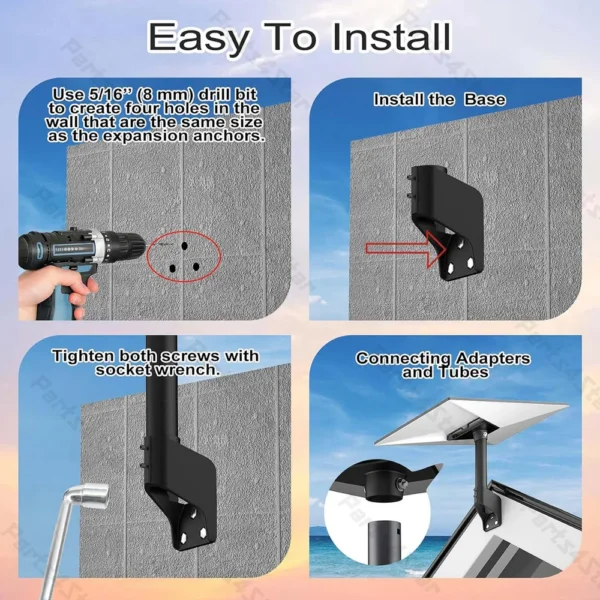
Easy 4-Step Installation (Yes, Just 4!)
Installing the Starlink Gen 3 mount is so simple that anyone can do it. Here are the four basic steps shown in the product guide:
Step 1: Drill Anchor Holes
Use the included 5/16” (8mm) drill bit to make four anchor holes in your wall or roof.
Step 2: Secure the Base
Attach the base bracket to the surface with the provided heavy-duty screws.
Step 3: Attach the Pole
Use the included socket wrench to tighten the mounting pole into position.
Step 4: Mount the Starlink
Slide your Starlink Gen 3 dish onto the top and adjust it to your ideal angle. Done!
It’s quick. It’s solid. And yes—it works.
Real Customer Reviews
Don’t just take our word for it. Here’s what some of our happy customers are saying:
“Got it installed today. Starlink aligned perfectly, couldn’t be happier!”
“Excellent mount. Love this!”
The consistent feedback? Quick install, solid construction, reliable performance.

Built for Wind and Weather
One of the biggest worries Starlink users have is whether the dish will stay put in strong winds or bad weather. This mount is designed to handle it all.
With stainless steel construction and a secure bolt design, your dish won’t shake or shift even during storms. In fact, one customer joked:
“It’s so strong, it laughs at wind!”
So whether you’re in the mountains, a windy coastline, or the open plains, your signal stays strong.

Use It Anywhere: Roof, Wall, RV & More
The real beauty of this Starlink Gen 3 mount is its flexibility. It’s perfect for:
- 🏠 Residential rooftops
- 🧱 Brick or concrete walls
- 🚐 Campervans or RV roofs
- 🏕️ Remote cabins and off-grid homes
The 360° adjustability lets you fine-tune your signal direction without moving the whole dish. Just loosen, twist, and lock.
Order from Parts4Star – Fast Shipping & Support
Ready to mount your Starlink Gen 3 today? Head to Parts4Star.com to order your 360° Adjustable Wall & Roof Mount Kit.
- Ships fast
- Full installation kit included
- Affordable and durable
- Trusted by real Starlink users
We’re here to help you get connected faster, with the tools and support you need.

Conclusion
If you’re searching for the easiest and fastest way to mount your Starlink Gen 3, this is the solution you’ve been waiting for. No extra tools. No messy instructions. Just a sturdy, adjustable mount that works on any roof or wall.
With great reviews, weather-ready strength, and a complete install kit, this Starlink Gen 3 mount makes setup simple for anyone, whether you’re a weekend warrior or an off-grid explorer.
👉 Mount your Starlink Gen 3 today in just 5 minutes—shop now at Parts4Star.com
